JHipsterのプロジェクトをGitLabでCI/CDする のバックアップ(No.9)
- バックアップ一覧
- 差分 を表示
- 現在との差分 を表示
- ソース を表示
- JHipsterのプロジェクトをGitLabでCI/CDする へ行く。
目次 †
JHipsterのCI/CDのページ †
https://www.jhipster.tech/setting-up-ci/
GitLabのCI/CDのページ †
dockerで動かす際の説明 https://docs.gitlab.com/runner/install/docker.html
https://about.gitlab.com/features/continuous-integration/
.gitlab-ci.yml ファイルとは †
.gitlab-ci.yml ファイルはパイプラインの構造と順序を定義し、以下のことを決めます。
- GitLab Runnerを使って実行する内容。
- 特定の状況において、どのような判断をするか。例えば、処理が成功した場合と失敗した場合。
.gitlab-ci.ymlのリファレンス †
https://gitlab-docs.creationline.com/ee/ci/yaml/
GitLabのクイックスタート †
https://gitlab-docs.creationline.com/ee/ci/quick_start/README.html
GitLabの設定サンプル †
https://gitlab-docs.creationline.com/ee/ci/examples/README.html
mavenを使った例 †
https://gitlab-docs.creationline.com/ee/ci/examples/artifactory_and_gitlab/index.html
spring-bootを使った例 †
https://gitlab-docs.creationline.com/ee/ci/examples/deploy_spring_boot_to_cloud_foundry/index.html
jhipster ci-cdをためす †
jhipster ci-cd
を実行してみる
選択枝でGitLabを選ぶ
In GitLab CI, perform the build in a docker container
となる。
y
を選ぶ
.gitlab-ci.yml
が変更になる
.gitlab-ci.yml に追加されたコード †
追加のタスクは何もなしで進むと以下のコードが追加された
image: jhipster/jhipster:v7.9.3

cache:
  key: '$CI_COMMIT_REF_NAME'
  paths:
    - .maven/
stages:
  - check
  - build
  - test
  - analyze
  - package
  - release
  - deploy
before_script:
  - export MAVEN_USER_HOME=`pwd`/.maven

nohttp:
  stage: check
  script:
    - ./mvnw -ntp checkstyle:check -Dmaven.repo.local=$MAVEN_USER_HOME

maven-compile:
  stage: build
  script:
    - ./mvnw -ntp compile -P-webapp -Dmaven.repo.local=$MAVEN_USER_HOME
  artifacts:
    paths:
      - target/classes/
      - target/generated-sources/
    expire_in: 1 day

maven-test:
  services:
    - docker:dind

  variables:
    # Instruct Testcontainers to use the daemon of DinD.
    DOCKER_HOST: 'tcp://docker:2375'
    # Improve performance with overlayfs.
    DOCKER_DRIVER: overlay2

  stage: test
  script:
    - ./mvnw -ntp verify -P-webapp -Dmaven.repo.local=$MAVEN_USER_HOME
  artifacts:
    reports:
      junit:
        - target/surefire-reports/TEST-*.xml
        - target/failsafe-reports/TEST-*.xml
    paths:
      - target/surefire-reports
      - target/failsafe-reports
      - target/site
    expire_in: 1 day

frontend-test:
  stage: test
  script:
    - npm install
    - npm test
  artifacts:
    reports:
      junit: target/test-results/TESTS-results-jest.xml
    paths:
      - target/test-results
      - target/jacoco
    expire_in: 1 day

maven-package:
  stage: package
  script:
    - ./mvnw -ntp verify -Pprod -DskipTests -Dmaven.repo.local=$MAVEN_USER_HOME
  artifacts:
    paths:
      - target/*.jar
      - target/classes
    expire_in: 1 day
# Uncomment the following line to use gitlabs container registry. You need to adapt the REGISTRY_URL in case you are not using gitlab.com
#docker-push:
#    stage: release
#    variables:
#        REGISTRY_URL: registry.gitlab.com
#        IMAGE_TAG: $CI_REGISTRY_IMAGE:$CI_COMMIT_REF_SLUG-$CI_COMMIT_SHA
#    dependencies:
#        - maven-package
#    script:
#        - ./mvnw -ntp jib:build -Pprod -Djib.to.image=$IMAGE_TAG -Djib.to.auth.username=gitlab-ci-token  -Djib.to.auth.password=$CI_BUILD_TOKEN -Dmaven.repo.local=$MAVEN_USER_HOME
GitLab Runnerは別サーバー? †
もしかしてGitLabRunner?は別サーバにたてるのだろうか?
以下に構築方法を解説しているサイトがあった。
Dockerコンテナでgitlabとgitlab-runnerを構築してCI/CD †
https://syachiku.net/docker-gitlab-gitlab-runner/
docker-composeに追加するコード †
  gitlab-runner:
    image: gitlab/gitlab-runner:latest
    container_name: gitlab-runner
    restart: always
    volumes:
      - /var/run/docker.sock:/var/run/docker.sock
      - /root/gitlab/gitlab-runner-config:/etc/gitlab-runner
    ports:
      - "8093:8093"
必要なディレクトリやファイルを作成 †
mkdir -p /root/gitlab/gitlab-runner-config
GitLab Runnerを使用する前に、GitLabの管理者アカウントでGitLab Runnerを登録する必要があります。 †
GitLabの公式ドキュメント †
https://docs.gitlab.com/runner/
正直、オンプレミスではどうしたらよいのか親切には書いてない。
日本語の解説サイト †
GitLab Runner構築のススメ †
https://www.gitlab.jp/blog/2022/09/26/runner-summary/
画面のキャプチャとかあって、本家よりわかりやすいかもしれない。インストール部分は、自分はdocker-composeを使ったので、参考にしてないが、GitRunner?の登録の仕方が本家の説明で要領を得なかったので、ここを参考にした。
手順 †
- GitLab全体の基本設定のほうではなく、プロジェクトのサイドメニューから設定->CI/CD->Runnerを開いてください。
- Specific runnersに表示されているURL (GitLabのURLです)とregistration tokenの二つをメモする
メモしたい項目の具体的な項目名:
- Register the runner with this URL:
- And this registration token:
gitlab-runnerのコンテナ名の調査 †
docker-compose ps
起動させてあるのが、前提条件ですが、上記のコマンドで、実行済みのgitlab-runnerのコンテナ名を調べます。
docker-imageへのログイン †
docker exec -it 上記手順で調べたドッカーコンテナ名 bash
登録コマンドの実行 †
コマンドを実行する前に、どのようなコマンドがあるのか確認してみましょう。
gitlab-runner --help
登録に実行するコマンドは、以下のコマンドですが、、
gitlab-runner register
上記コマンドだと、インタラクティブなのですが、コマンドラインだけでやる方法もあります。
gitlab-runner register --non-interactive --locked=false --url=<URL> --registration-token=<token> --name=container-runner --tag-list=tag-runner --executor=docker --docker-privileged=true --docker-image=docker:20.10.15-dind
Shell
で、参考にしたサイトは
https://e-penguiner.com/build-gitlab-runner-with-docker/
です。
実行すると、上記の場合は質問されないです。いろいろなサイトで見つけるやり方だといくつか質問をしてくるので、上記手順でメモした内容で答えていきます。
実行タイプはdockerを選んだほうがdocker上のGitLabに認識してもらえるので、いいかと思います。
質問結果は以下に保存されます。
/etc/gitlab-runner/config.toml
編集のために、コンテナの名前を確認します。
docker-compose ps
仮に、
gitlab-web-1
というコンテナ名でgitlabが動作していたとします。
docker exec -it gitlab-web-1 bash
cd /etc/gitlab-runner
テキストエディタのviがインストールされていないので、インストールします。
apt-get update
apt-get install vim
gitlab-runnerのサービスのインストール †
gitlab-runner install --user=gitlab-runner --working-directory=/home/gitlab-runner
実行は、
gitlab-runner run &
です。
停止は、
gitlab-runner stop
です。
GitLabでSpecific Runnerが表示されたあと何をするのか? †
GitLab.comではShared Runnerは限定されますが、オンプレミスGitLabではShared RunnerとSpecific Runnerの両方が利用可能であり、全体的に共有されたRunnerの設定が便利です。
Shared Runnerの設定 †
gitlab-runner registerで利用するトークンの取得 †
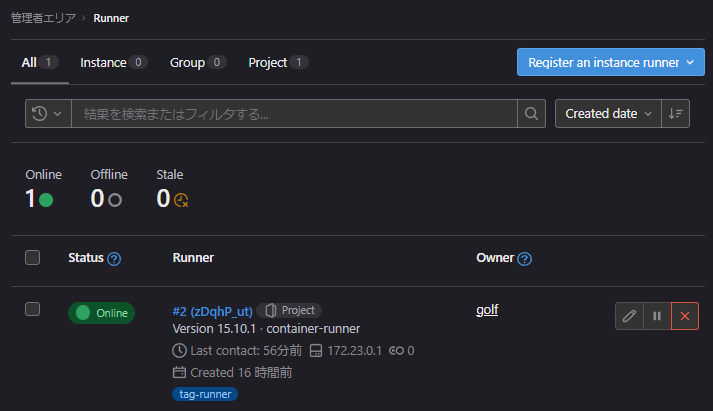
GitLabのどこで、トークンを取得できるかというと、[Menu] > [Admin] を選択し,[Overview] > [Runner]を選択します
右上の「Register an instance runner」ボタンをクリックすると、gitlab-runner registerで利用するトークンを取得することができます。
gitlab-runner registerでのrunner登録例 †
dockerのgitlab-runnerコンテナ名がroot-runner-1だった場合のrunner登録例です
docker exec -it root-runner-1 gitlab-runner register --non-interactive --locked=false --url=<URL> --registration-token=<token> --name=container-runner --tag-list=tag-runner --executor=docker --docker-privileged=true --docker-image=docker:20.10.15-dind
CI/CDの実行 †
GitLabで、runnerの実行ユーザを設定する †
GitLabのrunnerの実行ユーザは設定できます。
Advanced configuration †
https://gitlab-docs.creationline.com/runner/configuration/advanced-configuration.html
設定ファイルは、それぞれのrunnerのdockerコンテナごとにあるような感じです。
設定ファイルの場所は、もしrootで実行しているならば、
/etc/gitlab-runner/config.toml
にあるし、rootでの実行ではないならば、それぞれのユーザの
~/.gitlab-runner/config.toml
にあります。
gitlab-runnerをdockerのイメージで実行している場合は、viエディタがインストールされていませんので、以下のコマンドでインストールする必要があります。
apt-get update
apt-get install vim
[runners.docker]
のuserを設定します gitlab-runnerのコンテナですでに以下のユーザが登録されています。
gitlab-runner
HelloWorld?的な簡単な設定ファイル †
まずは、設定があっていれば必ず成功するレベルの簡単な自動実行をチュートリアルとしてやってみます。
以下の設定ファイルが簡単な設定ファイルと、紹介サイト(https://e-penguiner.com/build-gitlab-runner-with-docker/)には書いてありました。
シンプルな.gitlab-ci.yml †
image: docker:20.10.15

services:
  - docker:20.10.15-dind

variables:
  DOCKER_DRIVER: overlay2
  DOCKER_TLS_CERTDIR: ""

before_script:
  - docker info

test_ci:
  script:
    - docker pull alpine:latest
    - docker run alpine:latest cat /etc/alpine-release
  tags:
    - tag-runner
.gitlab-ci.ymlの実行のさせ方 †
ブランチを作って、上記ファイルを含むマージリクエストを作った時点で、動作するようになります。
このyamlファイルの仕様については、以下が元の記事らしいのですが、わかりにくいので、ほかの記事も参考にしていきましょう。
参考記事 †
本家 †
https://gitlab-docs.creationline.com/ee/ci/yaml/
はじめてのGitLab-CI †
https://qiita.com/yurano/items/a7804d987ccff37b1a9d
JHipsterでのCI/CDの記事 †
https://www.jhipster.tech/setting-up-ci/#what-cicd-pipeline-do-you-want-to-generate-
